Threat model (maximum suspicion)
This article assumes almost nothing is trustworthy by default. If we draw no trust boundary at all, then no software-only solution can exist, because an attacker can always control the device or the software.
So I make three temporary trust assumptions only for reasoning:
- iOS on a real device: treated as a baseline trusted OS.
- Pixel official Android (latest): similar or slightly lower trust than iOS.
- Ubuntu (latest): treated as a trusted open-source OS.
This is not a claim of absolute safety. If the OS, firmware, supply chain, or update channel is compromised, the endpoint is lost and encryption fails. Everything below only makes sense if these temporary assumptions hold.
Read More
Sometimes we may find that a program is occupying a port, and we cannot use this port.
We can use two commands to solve this problem.
Find the program
netstat -anp | grep 4000
tcp6       0      0 :::4000                 :::*                    LISTEN      81970/hexo
Here we can find the PID 81970 before the program name. (You may need sudo to see the process name, and netstat may require net-tools to be installed.)
Kill the program
kill -9 81970
If the permissions are not enough, add sudo before the command.
Read More
This method consolidates common fixes from multiple tutorials and worked for me.
Install mailutils
sudo apt install mailutils
sudo nano /etc/postfix/sasl_passwd
Input SMTP server, account and password.
[smtp.126.com]:465 username@126.com:password
The password of the 126 mailbox needs to generate an authorization code in the settings.
Then run postmap.
sudo chmod 600 /etc/postfix/sasl_passwd
sudo postmap /etc/postfix/sasl_passwd
Read More
In daily life, we may need to create a socks server to provide network for other hosts.
I summarized the method of creating socks service through dante-server under Ubuntu 20.04.
install dante-server
sudo apt install dante-server
add user for dante-server
Use this method to create a user to prevent it from logging in.
sudo useradd -s /sbin/nologin dante-socks
Edit the configuration file
sudo nano /etc/danted.conf
minimal configuration for dante-server
logoutput: syslog stdout
internal: ztuku335yr port = 1080
external: ens3
user.notprivileged: dante-socks
clientmethod: none
socksmethod: none
#allow connections from local network
client pass {
        from: 10.0.0.229/24 to: 0.0.0.0/0
        log: error # connect disconnect
}
socks pass {
        from: 0.0.0.0/0 to: 0.0.0.0/0
        command: bind connect udpassociate
        log: error # connect disconnect iooperation
}
socks pass {
        from: 0.0.0.0/0 to: 0.0.0.0/0
        command: bindreply udpreply
        log: error # connect disconnect iooperation
}
Note:
internal: the local interface that Dante listens on (use your actual interface name).external: the outbound interface used for connections (use your actual interface name).clientmethod: none and socksmethod: none mean no authentication—use with caution if the server is reachable by untrusted networks.
Read More
Install nvme-cli
sudo apt-get install nvme-cli
List disks
sudo nvme list
View the details of the hard drive
sudo nvme smart-log /dev/nvme0
Auto refresh status
sudo watch -n 1 nvme smart-log /dev/nvme0
Only view the temperature info
sudo nvme smart-log /dev/nvme0 | grep "^temperature"
Read More
To create a private Ubuntu mirror, the commonly used tools are debmirror and apt-mirror.
As of today (2021-05-18), these two tools have their own advantages and disadvantages.
debmirror
debmirror document
debmirror has many downloading methods, and it will compare the local file with the file on the server before downloading so that only the missing files are downloaded. However, it does not seem to support multi-threaded downloading. Debmirror is downloaded one by one, so the download speed is relatively slow.
apt-mirror
apt-mirror document
apt-mirror uses 20 download threads by default in my setup. If you choose a suitable mirror station, the download speed can reach the maximum of my network. However, it does not seem to make a comparison. Although it can speed up the download start speed, sometimes some files may be lost, resulting in an incomplete mirror, so the client
cannot be updated.
how to write the config file
In order to download the complete package, we need to modify the configuration file in /etc/apt/mirror.list. Use this format to ensure that the i386 package will be downloaded.
deb-amd64 http://mirrors.aliyun.com/ubuntu focal main restricted universe multiverse
deb-i386 http://mirrors.aliyun.com/ubuntu focal main restricted universe multiverse
Combine them together
Therefore, in order to achieve a balance between efficiency and completeness, we can combine apt-mirror and debmirror.
We can first use apt-mirror to download quickly, then we can use debmirror to check and download the missing packages.
Maybe this is the best way to download the Ubuntu mirror.
Read More
Commit code
git add .
git commit -m "feat: xxxxxx"
Undo the last commit (keep changes)
git reset --soft HEAD~1
This removes the last commit while keeping your working tree changes.
git reset parameters
--mixed
do not discard working tree changes, cancel the commit, and unstage changes (cancel the git add . operation). This is the default parameter.
--soft
do not discard working tree changes, cancel the commit, and keep changes staged.
--hard
discard working tree changes, cancel the commit, and unstage everything. After completing this operation, it is restored to the last commit state.
Read More
Using NodeSource
Refer to the NodeSource documentation for more information on the available versions.
Node.js v14.x (legacy, 2021-era)
curl -fsSL https://deb.nodesource.com/setup_14.x | sudo -E bash -
sudo apt-get install -y nodejs
curl -fsSL https://deb.nodesource.com/setup_14.x | bash -
apt-get install -y nodejs
Upgrade npm
Note: This post reflects the 2021 setup. Node.js v14 is now EOL; use the current LTS for new installations.
Also, curl | bash should only be used if you trust the source.
npm install -g npm
Read More
LVM overview
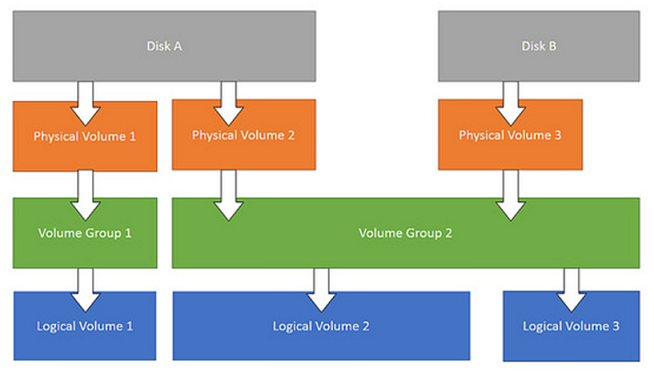
Physical Volume (PV)
Refers to a disk partition, or a device (such as RAID) that has the same function as a disk partition. It is the basic storage logical block of LVM, but compared with basic physical storage media (such as partitions, disks, etc.), it contains LVM-related Management parameters.
Volume Group (VG)
Similar to a physical disk in a non-LVM system, it is composed of one or more physical volumes PV. One or more LVs (logical volumes) can be created on the volume group.
Logical Volume (LV)
Similar to disk partitions in non-LVM systems, logical volumes are built on the volume group VG. A file system (such as /home or /usr, etc.) can be established on the logical volume LV.
Read More
When using golang to write complex projects, it is often useful to use multi-goroutine concurrency scenarios. At this time, it is easy to cause the problem of goroutine leaks due to negligence, and then produce similar memory leaks. This article focuses on the investigation of goroutine leaks, and provides ideas and practices for visual analysis of golang program memory.
Introduction to pprof
pprof is a tool for visualization and analysis of profiling data.
pprof reads a collection of profiling samples in profile.proto format and generates reports to visualize and help analyze the data. It can generate both text and graphical reports (through the use of the dot visualization package).
How to use pprof
Add monitoring code
First, we need to add monitoring code in the golang program, and expose it through the http interface.
package main

import _ "net/http/pprof"
import "net/http"

func main() {
	go func() {
		_ = http.ListenAndServe("0.0.0.0:8081", nil)
	}()
	// your code
}
Note: Exposing pprof on 0.0.0.0 makes it accessible on the network. If you don’t need remote access, prefer 127.0.0.1.
Then we start the program that needs to be analyzed, and we are ready to analyze it.
Read More