Online expansion of Ubuntu LVM disk
LVM overview
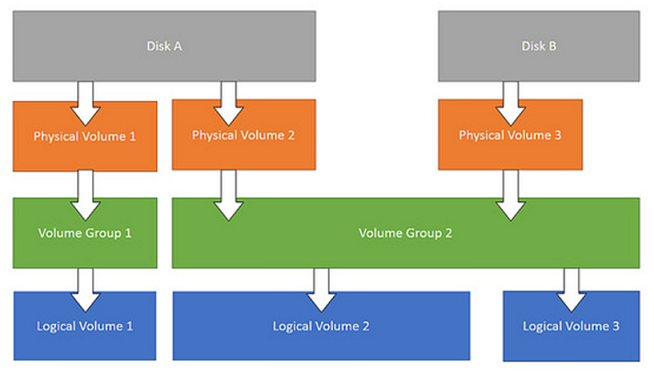
Physical Volume (PV)
Refers to a disk partition, or a device (such as RAID) that has the same function as a disk partition. It is the basic storage logical block of LVM, but compared with basic physical storage media (such as partitions, disks, etc.), it contains LVM-related Management parameters.
Volume Group (VG)
Similar to a physical disk in a non-LVM system, it is composed of one or more physical volumes PV. One or more LVs (logical volumes) can be created on the volume group.
Logical Volume (LV)
Similar to disk partitions in non-LVM systems, logical volumes are built on the volume group VG. A file system (such as /home or /usr, etc.) can be established on the logical volume LV.
LVM Expansion: A Safe and Standard Guide
This guide provides a step-by-step process for safely expanding an LVM logical volume on Ubuntu.
Step 1: Create a New Partition
If you have expanded your virtual machine’s hard disk, you’ll need to create a new partition to use the added space.
# Assuming /dev/sda is your primary disk
sudo fdisk /dev/sda
Inside fdisk, use n to create a new partition. Follow the prompts, and then use w to write the changes to the partition table. A new partition like /dev/sda3 will be created.
If you’ve added a new physical disk (e.g., /dev/sdb), the process is similar: sudo fdisk /dev/sdb.
Step 2: Create a Physical Volume (PV)
This is a critical step. The new partition must be initialized as an LVM Physical Volume. Do not format it with mkfs.
# Replace /dev/sda3 with your new partition's path
sudo pvcreate /dev/sda3
This command flags the partition for LVM use.
Step 3: Find Your Volume Group (VG) Name
Use vgdisplay to find the name of the Volume Group you want to expand. On a standard Ubuntu system, this is usually ubuntu-vg.
sudo vgdisplayLook for the VG Name line. Let’s assume it’s ubuntu-vg.
Step 4: Extend the Volume Group
Add the newly created Physical Volume to your Volume Group.
# Replace ubuntu-vg and /dev/sda3 with your actual VG name and partition
sudo vgextend ubuntu-vg /dev/sda3
After this, vgdisplay should show increased VG Size and Free PE / Size.
Step 5: Find Your Logical Volume (LV) Path
Use lvdisplay to find the path of the Logical Volume you wish to expand. It will typically be something like /dev/ubuntu-vg/root.
sudo lvdisplayNote the LV Path.
Step 6: Extend the Logical Volume
Now, extend the Logical Volume to use the free space in the Volume Group. You have two common options:
Option A: Extend by a specific size
# Adds 50GB to the logical volume. Use G for Gigabytes, T for Terabytes.
sudo lvextend -L +50G /dev/ubuntu-vg/root
Option B: Extend to use all available free space (Recommended)
This is often the easiest and most useful option.
# The -l +100%FREE flag tells it to use all available space in the VG.
sudo lvextend -l +100%FREE /dev/ubuntu-vg/root
Step 7: Resize the Filesystem
After expanding the logical volume, you must resize the filesystem on it to actually use the new space.
First, find the correct filesystem path to use. It’s usually found in the output of df -h. For a standard Ubuntu system, it will be /dev/mapper/ubuntu--vg-root. Notice the double hyphen, which is how the device mapper represents /dev/ubuntu-vg/root.
df -hNow, resize it. The command depends on your filesystem type.
For ext4 (most common on Ubuntu):
# The -p flag shows progress.
sudo resize2fs -p /dev/mapper/ubuntu--vg-root
For XFS:
# Note: This command uses the mount point (e.g., /), not the device path.
sudo xfs_growfs /
Step 8: Verify the Result
Finally, run df -h again. You should see the expanded size reflected for your root filesystem.
df -hHow to Reduce an LV (High Risk!)
Shrinking a Logical Volume is a high-risk operation that can lead to permanent data loss if done incorrectly. Always back up your data before attempting this.
The cardinal rule is: You MUST shrink the filesystem BEFORE you shrink the Logical Volume.
The correct, simplified process is:
- Backup Your Data: Seriously.
- Unmount the Filesystem (if possible): It’s safest to do this from a live CD.
- Check the Filesystem: Run
e2fsck -f /dev/mapper/ubuntu--vg-root. - Shrink the Filesystem: Shrink it to a size smaller than your target LV size. For example, to shrink to 95G:
sudo resize2fs /dev/mapper/ubuntu--vg-root 95G - Shrink the Logical Volume: Now, shrink the LV to a size equal to or slightly larger than the new filesystem size.
# Shrink TO 100G sudo lvreduce -L 100G /dev/ubuntu-vg/root - Grow Filesystem Again: It’s good practice to grow the filesystem back to fill the LV completely.
sudo resize2fs /dev/mapper/ubuntu--vg-root
This process is complex and risky. For most users, expanding disk space is a much safer alternative.
Content licensed under CC BY-NC-SA 4.0.